Are you looking to make a catchy navigation menu for your WordPress site? Thinking of how to make it. WordPress Menus may grab your interest in a variety of ways. You can retain website visitors on your page for as long as you can after they arrive. Using a navigation menu WordPress is one of the most neglected methods.
The most significant cause of applying a menu is to provide good navigation for your site’s users. Therefore, most WordPress menus are also called WordPress Navigation menus. WordPress has a drag-and-drop menu interface that you can use to construct header menus, drop-down menus, and more.
In this blog, we’ll go through the fundamentals of the WordPress navigation menu. Moreover, the process of implementing it on the site, and the alternative options for designing engaging menus.
What is a Navigation Menu?
Menus are a significant feature that helps your site’s visitors to discover all of your information. It is one of the most notable advantages of making the entire website surfing procedure simple and easy for visitors.
The features of the navigation menu WordPress enable website owners and developers to add unique menu links to WordPress pages. It is introduced to the code of your functions.php file and configured to give certain aesthetic and operational aspects.
It is simple to create a menu with WordPress. A major navigation menu that has already been constructed is common among the finest WordPress themes.
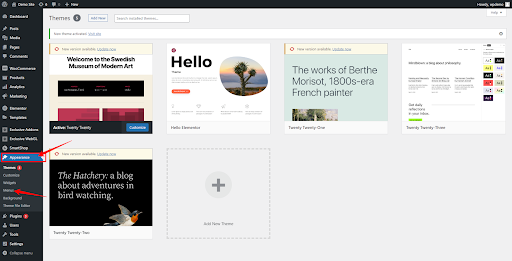
WordPress menus may be simply created and modified using the ‘Appearance>>Menus’ option in your dashboard. In the sections that follow, we’ll walk you through the whole process of designing a menu.
Importance of Navigation Menu WordPress
A well-organized navigation menu is essential for the success of any WordPress website. This plays a significant role in connecting the user to the site and getting their desired search. Here you get some crucial reasons for using the navigation menu.
- Well-designed navigation reduces bounce rate: Easy navigation through the site leads to the next level. This gives the visitors a better experience to grab potential customers.
- Rising Purchasing Possibility: People will spend more time on your website learning more about your content. It enhances the likelihood of a sale occurring.
- A Well Booster for SEO: The common rule to grab more visitors SEO plays a great role. Bots from search engines crawl the website, and having a superb and well-organized navigation bar enables them to efficiently index all of the material.
- Delivers a User-Friendly site: A well-organized WordPress navigation bar will make your site more user-friendly for your visitors.
Hope you are clear about how important is a navigation bar in a website to interact with the user. now let us learn How you can integrate a navigation menu on your site using WordPress.
Creating Your First Custom Navigation Menu
Function.php file needs to be accessed to implement the navigation menu on your site. WordPress developers provide simple and easy-to-use solutions in the shape of a navigation menu. A menu plugin adds additional useful functions and customization choices. Now let’s look at a step-by-step process to integrate the navigation menu.
Creating The Menu
Building WordPress menus is a very simple and easy process. To begin, move to the admin dashboard. You can find the appearance option here. Simply navigate to the Appearance → Menus.

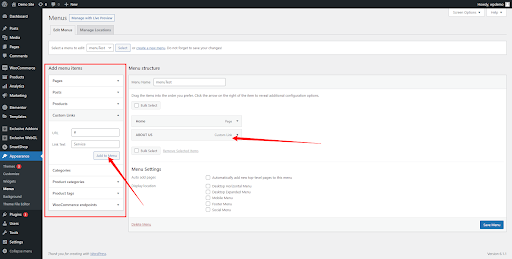
When you pick the option, you will see a MENUS interface with an Edit Menus screen. It separates it into two columns: Add menu items and Menu structure. However, the left column “Add Menu Items” was hidden before building a menu.

The Menu Structure column on the right allows you to build a new menu by typing a name in the MENU NAME box and then clicking Create Menu. By clicking on the Create Menu button your menu will be ready to use.
Adding More Items on the Navigation Menu
After creating a menu you need to add menu items or links to connect pages or sections of the site. To witness a better experience the navigation menu is a great tool to win users’ minds.
Select menu Items from the left side “Add menu items” options” for different categories like Pages, Posts, Custom Links, etc.

Custom links are usually added in the menu to navigate throughout the landing page. This gives a good user experience as they can find their searches easily.
To add a custom menu select “custom menu” → Add Link and Link Text → click add to menu button

Deleting menu items or Menu
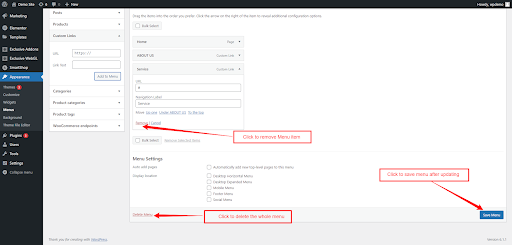
To remove an item from your menu bar, click the drop-down point of the menu item and select the remove option. As a result, the menu item will be removed from the navigation bar. Lastly, to delete the full menu click on the Delete Menu option.

After deleting and completing the menu setup click on the Save Menu option to save all the changes.
This process of adding and customizing a menu in WordPress gives an excellent experience to the user and holds them back. Therefore, it reduces the bounce rate and helps to boost business with potential customers.
Creating Navigation Menu With Elementor
Creating a versatile menu with Elementor is the simplest way of making robust designs. Here, you may create several sorts of menus with Elementor and widgets as the best choice. In recent times, there have been a lot of widgets used but Exclusive Addons are exceptional. Also, you can make elegant designs of your menu and connect users easily
There are several types of menus that you can change according to your requirements. Let’s take a quick stroll on them.
- Mega menu
- Nav menu
- Hamburger menu
Generally, each type of menu plays an important role and is used in different cases to interact with the user. Let’s learn the method of implementing a menu using Exclusive add-ons.
Step #1

First, you must create a normal navigation menu WordPress as shown previously in this article. Next, complete creating a menu and save it properly. Once you’ve finished designing the menu, click the Save Menu button in the bottom-right corner of the page.
Step #2

After creating the menu go to the Elementor page builder. Simply choose the Nav menu option and customize the menu using Elementor’s editing panel. Surely, Exclusive Addons has given you a bundle of options with premade templates to make your site look elegant.
Now changing the styles and customizing the menu is a very easy process with a variety of options where novice users can work like professionals. In time, you can implement and customize all kinds of menus using the Exclusive Addons widgets according to your site’s requirements.
Creating Navigation Menu With Gutenberg
Integrating the navigation menu WordPress using Gutenberg Block editor has taken the design process to the next level. As Gutenberg is a built-in editor, designing is easy with the drag-and-drop feature.
As a result, the navigation menu can be easily implemented and connected to each block section. Let’s look at the process of creating a navigation menu with a block editor.

in the second place, click on the plus icon and select the grid layout for the menu section. This classifies the number of columns in a row. After taking the grid search for the navigation menu and insert the menu.

Using the WordPress Gutenberg Menu Block will provide several advantages for your WordPress site. At first, it’s not only to assist you in creating information-rich menus. However, it also allows you to personalize the menu. Now, you may easily arrange information and enhance the navigation system.
Wrapping Up
The days of dull and tedious menus have passed, thanks to advancements in online design. You may now create a unique and creative menu for your website. Hence, menus are a core pillar of a website that not only makes it more appealing to visitors but also helps its rank in search engines.
We hope that this post has helped you understand the significance of the navigation menu WordPress for your website. This article gives you a clear idea of how to set up your menu bar in WordPress in greater depth.